
Are you interested in learning how to make a deerskin jacket? If so, this guide is for you.
There are many ways to make a jacket, but this one is special. This is the way my grandfather showed me how to make it. It’s not as hard as you think, and it will keep you warm all winter. Follow these steps, and you’ll be ready to hit the cold weather in style!
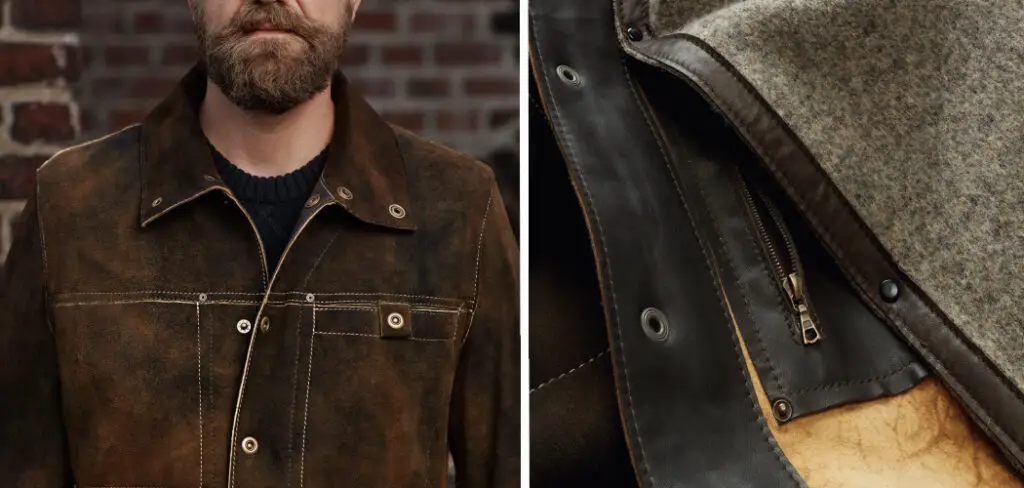
A jacket is a must-have for the colder months, but not just any jacket will do. If you want to be prepared for anything the winter might throw your way, you need a deerskin jacket. Deerskin is incredibly warm and durable, making it the perfect material for a winter jacket. In this article, we’ll show you how to make it. So put on your creative hat, and let’s get started!
What Will You Need?
To make a deerskin jacket, you’ll need some basic materials:
- Deerskin, in the size and shape that you want your jacket to be
- Scissors or a utility knife
- A sewing machine or needle and thread
- Buttons or other closures for your jacket
- Tape measure or ruler
Once you have gathered these materials, you’re ready to get started.
10 Easy Steps on How to Make a Deerskin Jacket
Step 1: Cut the Deerskin to the Desired Size and Shape
The first step in making a deerskin jacket is to cut the deerskin into the desired size and shape. Depending on how you want your jacket to look, you might need to use a sewing machine or needle and thread to sew the edges together. Ensure that you use a sharp knife or scissors to get clean, even cuts on your deerskin.
Step 2: Sew the Jacket Together
Once your deerskin is cut to the desired size and shape, you can begin sewing it together. For a simple jacket, you might only need to sew two sides together along the front and back of the garment. If you are using a sewing machine for this step, be sure to use heavy-duty thread or else the seam may start to come apart over time.
Step 3: Add Buttons or Other Closures
Depending on your deerskin jacket’s look, you might also want to add buttons or other closures. This step can be done either before or after sewing together all of the pieces of your jacket. So feel free to do it in a way that makes sense for your project.
Step 4: Add Pockets, if Desired
Some people like to add pockets to their deerskin jackets for added functionality and style. If you want to do this, just cut a piece of deerskin in the desired size and shape of the pocket, then sew it onto the front or side of your jacket. You can also use buttons or other closures if you’d like your pocket to be closed when not in use.
Step 5: Finish Your Jacket by Adding Lining and/or Trim
If you want a high-quality jacket, consider adding lining and trim before finishing your project. This extra step will make your jacket look nicer and more comfortable. Moreover, it will also help protect your deerskin from tears or other damage over time.
Step 6: Enjoy Your New Jacket!
Once you have completed all of the steps in this guide, you’ll be ready to enjoy your new deerskin jacket. Whether you’re braving the cold outdoors or just hanging out at home, you can be assured that your jacket is stylish and functional. So put it on and head with confidence!
Step 7. Maintain Your Jacket
In order to keep your deerskin jacket looking and feeling its best over time, it’s important to maintain it properly. This means regularly spot-cleaning or gently hand washing your jacket and avoiding exposure to extreme heat. Additionally, you may want to consider periodically applying conditioner or other protective products for additional protection.
Step 8. Use Your Jacket for Many Years to Come
With proper care and maintenance, you can be sure that your deerskin jacket will last many years. Whether you’re using it as your main winter jacket or just wearing it on special occasions, this versatile garment will surely become a staple in your wardrobe for years to come. So if you’re looking for a warm and durable jacket this winter, why not try making a deerskin jacket?
Step 9. Store Your Jacket Safely When Not in Use
Once the cold weather starts to subside, it’s important to store your deerskin jacket safely when not in use. This means keeping it out of direct sunlight and wrapped up in a protective covering, such as a cotton bag or pillowcase. Doing so can help prevent damage and ensure that your jacket stays looking and feeling great for years to come.
Step 10: Invest in Other Deerskin Products
If you love how your deerskin jacket looks and feels, consider investing in other deerskin products as well. Whether it’s a pair of gloves or boots made from this durable material, you’ll surely experience all of the benefits of deerskin. So why not discover how this unique material can enhance your wardrobe and lifestyle?
By Following these simple steps, you can easily make your own deerskin jacket and enjoy all of the benefits this unique material offers. Whether you’re looking for a warm winter jacket or just want to try something new, a deerskin jacket is sure to be a great choice! So what are you waiting for? Start crafting today!
5 Additional Tips and Tricks
- Before you begin sewing your jacket, be sure to use a seam ripper to carefully remove any stitches or other marks on the deerskin.
- To add extra structure and durability to your jacket, consider using fusible fabric interfacing along the seams and edges.
- If you want a truly professional finish for your jacket, look into purchasing a pre-made lining from a fabric store or online retailer.
- You can also customize your deerskin jacket by adding decorative trim such as fringe or embroidery along the sleeves or collar.
- Finally, don’t forget to take good care of your deerskin jacket by storing it properly when not in use, cleaning it regularly, and protecting it from heat and other sources of damage.
With these tips, you can enjoy your jacket for years to come!
5 Things You Should Avoid
1. Using deerskin that is too thin or damaged.
When selecting your deerskin, make sure to choose a piece that is thick and free from any holes or tears.
2. Skipping the preparation step.
Before you start working with your deerskin, it’s important to wash and prepare it according to the instructions provided by your jacket maker. This will ensure optimal results and prevent issues down the line.
3. Sewing without giving yourself enough room to work in.
If possible, try to create at least 4 inches of extra space around your deerskin when sewing so you have room to maneuver as you work. This will help prevent sagging or puckering on the finished product.
4. Forgetting about how hot and sweaty you might get.
Making a deerskin jacket can be quite labor-intensive, and you will likely find yourself working for long periods near the heat of your sewing machine or other tools.
5. Not following the care instructions once your jacket is finished.
To keep your deerskin jacket looking its best, be sure to follow any cleaning and maintenance guidelines provided by your jacket maker.
Taking these steps will help ensure that you can create a beautiful, high-quality deerskin jacket with ease and confidence.
How Many Deer Hides Does It Take to Make a Jacket?
A typical deerskin jacket requires multiple deer hides to create a full-length piece. Depending on the size and thickness of your deerskin, you may need anywhere from 2 to 4 hides in total.
To begin, you will need to start with clean and undamaged deerskin that is free from any holes or tears. Ideally, the skin should be tanned before use to prevent any shrinkage or warping as it dries out.
Next, you will want to cut your hides into long strips that are roughly 1-2 inches wide. These strips will form the individual pieces of your jacket and should be large enough to fully cover the armholes and other seams without overlapping.
So, the exact number will depend on the size and thickness of your deerskin, as well as the design and construction of your jacket. But in general, you can expect to need at least 2-4 hides per jacket for a full-length piece.
Frequently Asked Questions
Can You Use Deer Skin for Leather?
Deer skin is a great material to use for leather. It is thicker than cowhide and has a lower moisture content, making it a better choice for some leather products. However, deer skin is not as durable as cowhide, so it may not be the best option for items that need to last long.
Which Animal Skin is Best for Leather Jacket?
The type of skin will depend on the specific jacket specifications. However, common types of animal skin used for leather jackets include cow, pig, lamb, and buffalo. Each of these skins has its own unique properties that make it a good choice for certain types of jackets. For example, cow skin is known for its durability and resistance to wear and tear, making it a good choice for heavier jackets that will be subject to a lot of use. Pig skin is softer than cow or lamb skin and is therefore better suited for lighter jackets that may only be worn occasionally. Buffalo skin is tough but still soft enough to be comfortable to wear, making it a good choice for winter coats or jackets that will be used in colder weather conditions.
Is Deerskin Waterproof?
Yes, it is. Deerskin is a natural membrane that lines the inside of an animal’s skin and it is this membrane that makes deerskin water resistant. When wet, the deerskin barrier traps water and prevents it from penetrating the skin. This protection is important in conditions such as heavy rain or snow, when rain or snow could potentially enter the skin and cause discomfort or even flooding.
What is the Highest Quality Leather?
Leather is a durable and luxurious material that is often used in products such as shoes, wallets, and purses. The highest quality leather is made from full-grain leather, which is the skin of an animal that was processed using traditional methods such as tanning and shaving. Full-grain leather has a more natural look and feel than other types of leather, and it is also more resistant to wear and tear.
Conclusion
If you want to make your own deerskin jacket, follow the steps outlined in this blog post. With a little bit of time and effort, you’ll have a beautiful and unique piece of clothing that will keep you warm for years to come.
Now that you understand how to process deerskin properly, you are on your way to making a beautiful and unique garment. Deerskin is an excellent material for clothing because it is durable and soft. With proper care, your jacket will last for many years.
Hopefully, the article on how to make a deerskin jacket was helpful to you. But if you run into questions or need additional guidance, be sure to reach out to an experienced deerskin-making professional for help and advice. Good luck with your project!
You Can Check It Out to Style Black Leather Blazer