Drawing leather is a great way to create a unique piece. In this article, we will show you how to draw leather and then add some character to it. You can use this technique for bags, belts, wallets – any project that needs a bit of edge! Let’s get started.

Many artists will start with a dark brown or black base. Of course, you can use either one, but I find that painting the leather first makes the final color look more like real-life leather than just painting black on black.
Summary: Learning to draw leather is an important skill for any aspiring artist. It requires careful observation, patience, and knowledge of how to use light and shadow to create the desired texture and form. When drawing leather, pay attention to the folds and curves that make up its structure, adding darker tones in the creases where light doesn’t hit as much.
What You’ll Need
- Pencil (HB pencil and a 2B pencil)
- Ruler or straight edge
- Eraser
- Paintbrush or paper towel
- Colored Pencils (2 colors of your choice, brown and black)
How to Draw Leather Step by Step Guide
Step 1:
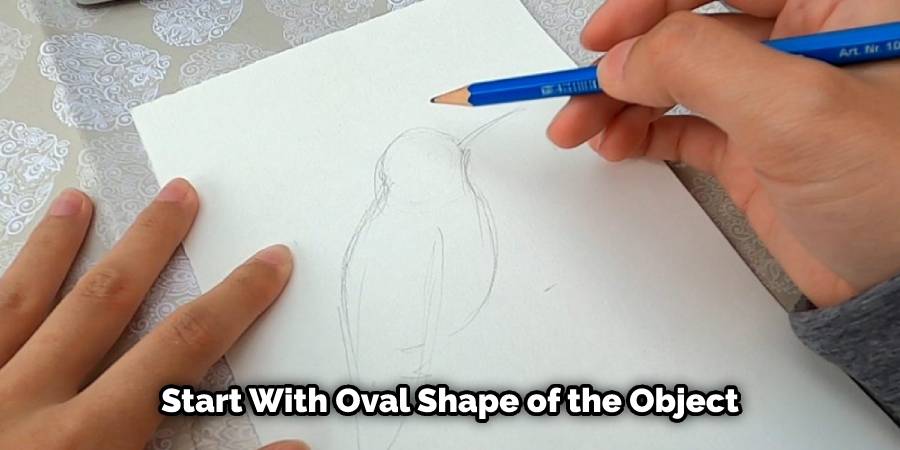
One of the most complicated materials to draw is leather. But it’s not impossible. Just take it one step at a time to achieve your goal. How you start will depend on your personal preference, but I recommend starting with three ovals for the basic shape of the object you are drawing (in this case, leather).
Step 2:
Add a smaller oval shape to the center of each larger one from step 1. Next, draw a line from the head of each oval, curving down and around. This will be how you show the folds in the leather. How many lines you draw will depend on your object’s thickness, but I usually use at least three or four for a scene like this one.
Step 3:
Create some thick, squiggly lines with your pencil to form cracks in your material. How close together these are is also up to you, but I usually keep them about two millimeters apart for medium thickness and five millimeters apart for thicker objects such as this one. These can vary in opacity depending on how clean or damaged your object appears to be. How long or jagged you make them is up to you, too.
Step 4:
Add some smaller lines inside the cracks for detail. How many of these you add depends on how much depth your object needs, but use at least two or three strokes here. Again, try using a very light hand when applying pressure to make these more delicate lines less visible than the darker ones in step 3.
Step 5:
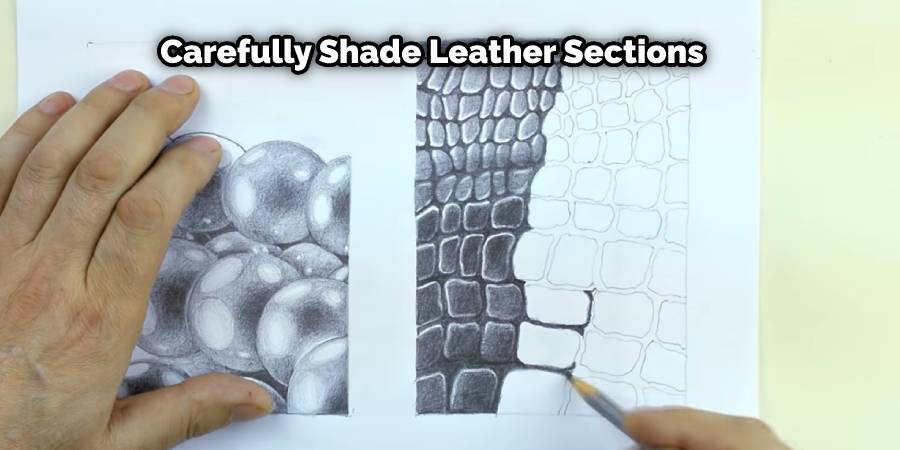
Using the color black, carefully shade leather sections within each crack with an eraser. How spread out this shading depends on how damaged your material seems, but it’s usually best to keep the darkest parts close together and have finer details closer to where one would expect normal wear-and-tear. How much of the black you use is also up to you, but I usually try not to cover the brown color from step 1 completely.
Step 6:
Using a lighter brown color adds depth and helps make your object appear more three-dimensional. It’s best to switch between light and dark colors on each oval rather than apply them with different pencils. How many strokes you use for this step is up to you; remember that minor detail will generally create a smoother texture while more information creates a rougher one.
Step 7:
With black colored pencils, carefully shade some leather sections with an eraser again. How many of these you put in is again up to you, but remember that the darker your lines are, the less depth your object will have. How close together or far apart the darkest parts are from each other is also up to you and how much you darken each section. The black lines should be placed within cracks and shouldn’t cover too much of the brown color from step 1.
Step 8:
Add a few more details to finish off your drawing. How detailed you make this part depends on what look you’re going for and your personal preference, so it’s okay if some sections or objects look different from others. In general, larger circles indicate buckles, while squiggly shapes represent seams. How many of these details you use is up to you again, but be careful not accidentally include too much detail for its own sake.
And there you have it. How long it takes to finish this drawing depends on how much time and effort you put into each step, so take your time with each one. How deeply colored the lines also affect the overall effect of the finished product, so remember that darker lines generally indicate a rougher texture while lighter ones add more depth. That’s pretty much all there is to it! Good luck!
Tips for Drawing Leather with Colored Pencils
- Start by lightly sketching the leather shape with a light gray graphite pencil.
- Layer pencil colors to create depth and texture of the leather. Start with dark colors like brown and black, then add lighter colors such as tans, beige, and brown to blend your shades.
- Use a blending tool like cotton swabs or trillions to blend pencil marks together. This will help create realistic-looking leather textures instead of solid flat colors.
- Create desired texture with various colored pencil strokes while layering colors on top of each other. Experiment with different types of mark-making techniques like stippling, scratching, smudging, and hatching to achieve the desired look.
- Add highlights by leaving some areas blank when you are layering colors, and use white colored pencils to add small details in empty spaces for more dimensionality in your drawing.
- Blend all edges between colors gently and build up layers slowly until the desired result is achieved!
Frequently Asked Questions
How Do You Shade Leather Texture?
Shading leather textures is a process that can be used to create a variety of different effects on your leather goods. The most common use for shading is to create a two-tone effect, which can be used to create a variety of different styles. Here are the steps you need to follow to shade your leather:
1. Prep the surface – Before you begin shading, you need to prep the surface. This includes cleaning the surface with a suitable solvent and then applying a protective coating.
2. Apply the shading – Once the surface is prepped and coated, you can start shading the leather. This involves using a series of dyes and paints to create the desired effect.
3. Finish up – Once the shading is complete, you will need to finish it off by either dry brushing or to wet down the area with water and applying a finish of your choice.
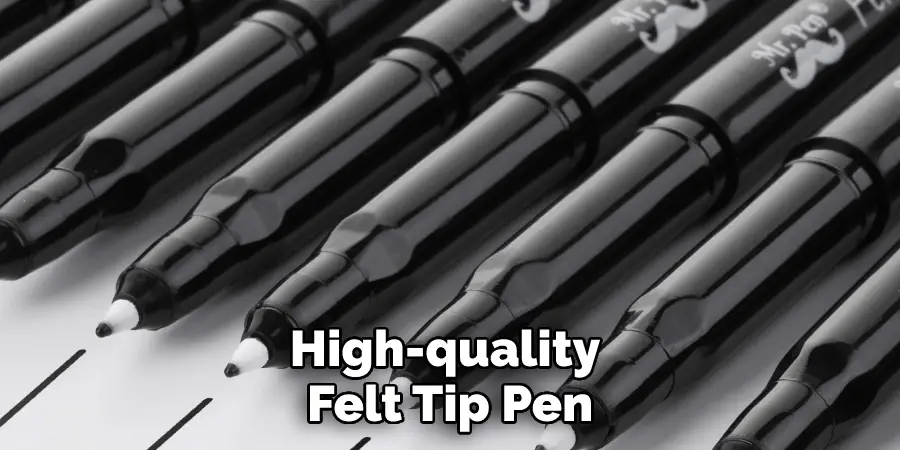
Can You Draw on Faux Leather?
Yes, you can draw on faux leather with a high-quality felt tip pen. Felt tips are made of polyester and are very soft. They allow for light but accurate strokes, and they won’t leave any permanent marks or markings on the faux leather surface.
Does Acrylic Paint Stay on Leather?
Acrylic paints are water-based and should be safe to use on leather. However, if you do have any doubts, it is always best to test a small quantity first. If the paint does begin to fade or bleed onto the leather, then it is time to remove it using a cleaner that contains Leather Conditioner.
Will Paint Stay on Leather?
It depends on a variety of factors, including the quality and type of leather, how often you polish your Leather goods, and the type of paint used. However, general tips include using a clean cloth or sponge to apply pressure while scrubbing, using only mild products (less than 200 degrees F) that are specifically designed for use on leather, and avoiding contact with water or damp surfaces.
Conclusion
The most important thing to remember is that leather drawing takes practice. As with any new skill, the more you do it, the better. So get out your sketchbook and start practicing today! You never know when you might need to draw some leather for a project. We hope you find this article on how to draw leather useful.