
Do you feel drawn to stunning leather goods like hand-tooled wallets, journals, and bags but don’t know where to start when it comes to crafting them yourself? Hand-tooling leather may seem intimidating at first glance, but this ancient art is far more accessible than many think.

Crafting leather by hand is an ancient art that has been passed down through generations, but it’s also a skill that anyone can learn with the right tools and techniques.
Whether you’re looking to make a wallet or purse to carry around your daily essentials, emboss beautiful decorations onto furniture pieces, protect your books with classic bookbinding, or just add some decoration to existing items, being able to use traditional hand tooling is an invaluable addition to any enthusiast’s skillset.
In this blog post, we will be looking at all the fundamentals of how to hand tool leather!
What Will You Need?
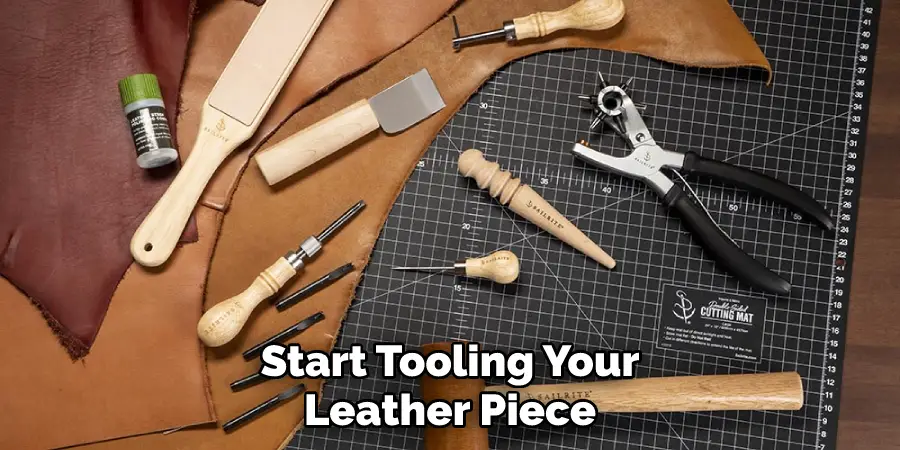
You’ll need a few basic tools and materials to get started with hand-tooling leather. The main supplies include:
1. Quality Leather: Look for full-grain vegetable-tanned leather, which is ideal for tooling as it has a smooth surface that’s easy to work with. It’s also more durable than other leather types and available in various colors.
2. Edge Beveler: This tool is used to smooth edges and remove any imperfections on the surface of your leather piece. It’s also essential for creating intricate patterns with precise control over how much material you want to remove.
3. Swivel Knife: This is used to create lines and shapes in the leather, such as lettering or simple designs. You can make straight or curved cuts depending on the type of pattern you’re trying to achieve.
4. Stamping Tools: These are designed specifically for tooling leather, allowing you to etch patterns into it using a hammer or mallet. The various tools create different shapes and patterns, allowing you to customize your leather piece with unique decorations.
5. Beeswax: This is used to protect the leather after tooling by creating a strong but flexible waterproof sealant that will help keep it looking good for many years.
6. Leather Dye: If you want to add color to your hand-tooled pieces, then leather dyes are a great option, as they come in a wide range of colors and won’t fade easily over time.

7. Sandpaper or Steel Wool: You’ll need these materials to smooth out any imperfections after tooling the leather before applying beeswax or dye.
Once you have all these supplies, you can start tooling leather!
10 Easy Steps on How to Hand Tool Leather
Step 1. Cut the Leather Piece:
Start by cutting your leather piece to the desired size and shape. Use a swivel knife and edge beveled for precision cuts when necessary. Be careful not to cut too deeply into the leather, as this could damage it.
Step 2: Prepare the Leather Piece:
Once you’ve cut your leather piece to size, you must prepare it for tooling. Use the edge beveled to smooth out imperfections and create a clean surface ready for tooling. If you plan on adding color to the piece, dye it before tooling.
Step 3: Design Your Pattern:
Once your leather piece is prepared, it’s time to decide on a design or pattern that you want to etch into the leather. Sketch your design on paper before transferring it onto your leather piece using a pencil. This will give you an idea of how the finished product should look and how much detail you can add in each area of the pattern.
Step 4: Transfer the Design Onto Leather:
Transfer the design from the paper onto the leather piece using a swivel knife, outlining each shape or line of your design. Be sure to take your time and ensure each line is precise, as this will ensure that the finished pattern looks professional. You can use a ruler for straight lines and a flexible curve ruler for curved lines.
Step 5: Mark Out Areas for Tooling:
Once you’ve transferred the design onto the leather, use a pen to mark out areas where you want to perform tooling. This will indicate how much material needs to be removed in those areas and how large or small certain shapes should be. Don’t forget to leave space between shapes for a professional look.
Step 6: Begin Tooling:
Start tooling your leather piece using either a mallet and stamping tools or just a hammer if you don’t have any stamping tools. Work slowly and carefully to create intricate patterns with precision. It is important to be gentle and use the right amount of pressure to ensure that your leather piece isn’t damaged.
Step 7: Remove Excess Leather:
Once you’ve finished tooling, use an edge beveled or swivel knife to remove any excess leather that may have built up during the process. This will ensure that your design is as neat and precise as possible. Don’t forget to be gentle when doing this.
Step 8: Smooth Out Imperfections:
After tooling, use sandpaper or steel wool to smoothen out any imperfections in the leather piece. This will help create a professional finish for your hand-tooled piece of leather. Additionally, if there are any rough areas, use a burnishing tool to even them out.
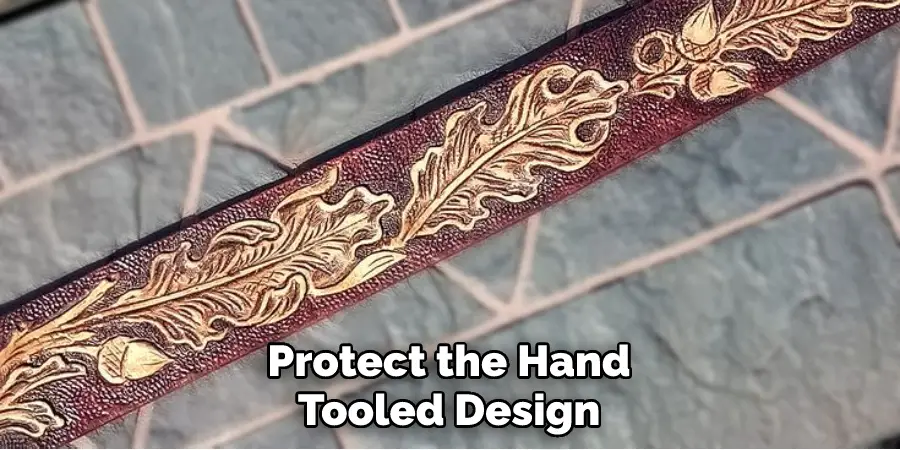
Step 9: Protect with Beeswax:
Finally, protect the hand-tooled design by applying a light coat of beeswax to it. This will create a strong but flexible seal that will help keep your leather piece looking great for many years. Moreover, it will also add an attractive sheen to the design.
Step 10: Dye the Leather (optional):
You can dye your leather piece using a high-quality leather dye if desired. This will add color and vibrancy to your hand-tooled piece, allowing you to customize it even further with unique colors and designs. Remember to let the dye dry completely before moving on to the next step.
By following these steps, you can create professional, intricate designs on leather pieces by hand-tooling. Hand-tooling is an art form in itself and requires patience and skill to create beautiful, detailed leather products. With some practice, you can master the art of how hand-tool leather and make stunning pieces of art.
5 Additional Tips and Tricks
1. Start by Selecting the Right Leather: When hand tooling leather, selecting a material that is thick enough to accommodate the tools and techniques you plan to use is important. If the leather is too thin, getting clean and crisp results will be difficult.
2. Use a Swivel Knife for Cutting: A swivel knife helps make quick and precise curves in the leather. It will also help ensure that your tooling pattern is consistent throughout.
3. Check Your Tooling Pattern: It is essential to check the consistency of your tooling pattern throughout the entire leather piece. This can be done by using a ruler or straightedge and comparing how each line connects to one another.
4. Use Multiple Layers of Dye: For a richer color, apply several thin layers of dye to the leather and allow it to dry between applications. The more layers you add, the deeper and richer the final color will be.
5. Finish Off With a Dye or Wax: Once all of your tooling’s is complete, you can finish it off with a natural dye or wax for added protection and shine. This will help ensure that your handcrafted creation lasts for years to come!
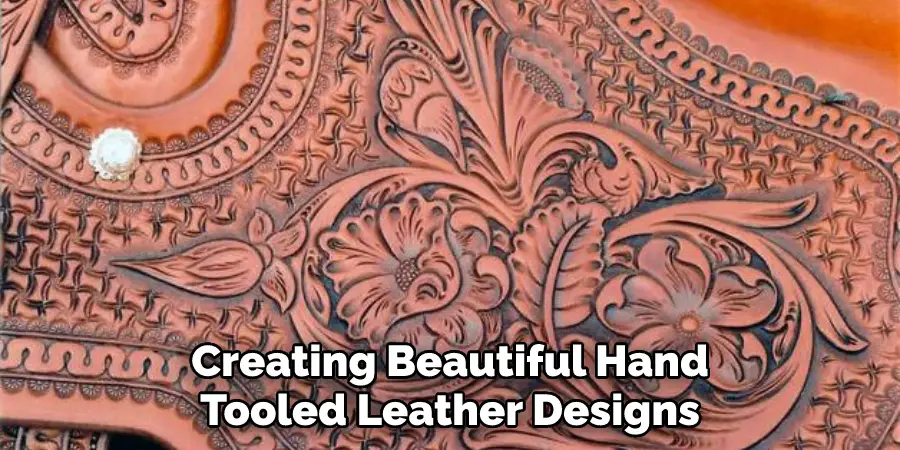
Hand-tooling leather is an art form that takes time and patience to perfect. With these tips and tricks in mind, you’ll be well on your way to creating beautiful hand-tooled leather designs of your own!
5 Things You Should Avoid
- Avoid using a tool that is too wide or deep to make the desired impression. The shape of the tool should be appropriate for making precise, controlled impressions in the leather.
- Don’t use too much force when hammering the tool into the leather; this can damage the material and create an uneven finish. Instead, gently tap on the handle of your chosen tool until you achieve the desired result.
- Be sure not to cut or gouge any part of your design; hand-tooled leather designs should have smooth lines to connect all parts seamlessly.
- Refrain from using sharp tools such as knives or saws when working with leather; these items can easily snag and ruin delicate materials like leather.
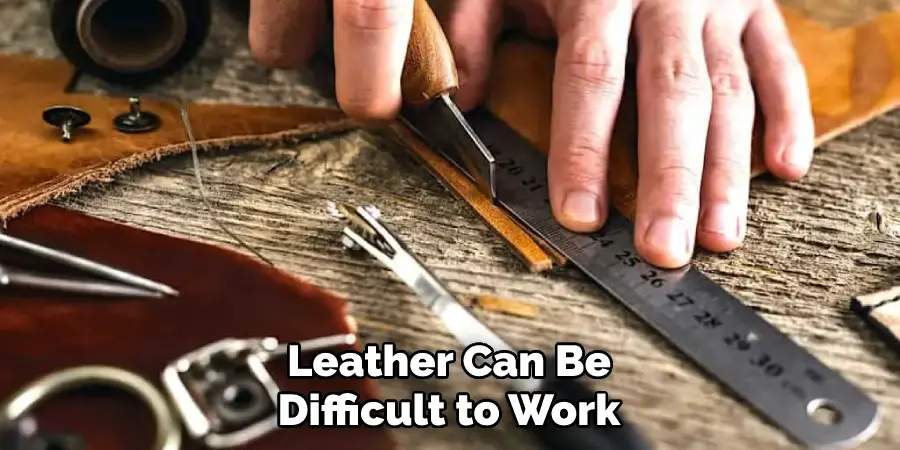
- Don’t rush the design process; leather can be difficult to work with and requires patience and attention to detail for the best results. Taking your time when hand-tooling leather will ensure that you create an attractive, long-lasting piece of art.
By following these tips, you can successfully create amazing designs on your leather pieces using hand tooling techniques. With practice, you’ll be able to craft beautiful pieces of art that are sure to turn heads!
Conclusion
To sum up, hand-tooling leather offers you an experience like no other. With the right materials and tools, you can easily create truly beautiful designs. Don’t forget to pay homage to the traditional artisans who have passed on their knowledge for centuries now and modern crafters who have uniquely adapted it for the present day.
As you practice the craft of tooling leather, you can look forward to growing in skill and developing a true passion for this unique art form. It’s perfectly normal to struggle a few times before achieving success, but that is half of what makes learning this skill so rewarding – when you’re done, there will be no chance of ever forgetting how much progress you’ve made!
So now that you understand the basics of how to hand tool leather. Get out there and give it a try – you never know how far your skills can take you!