
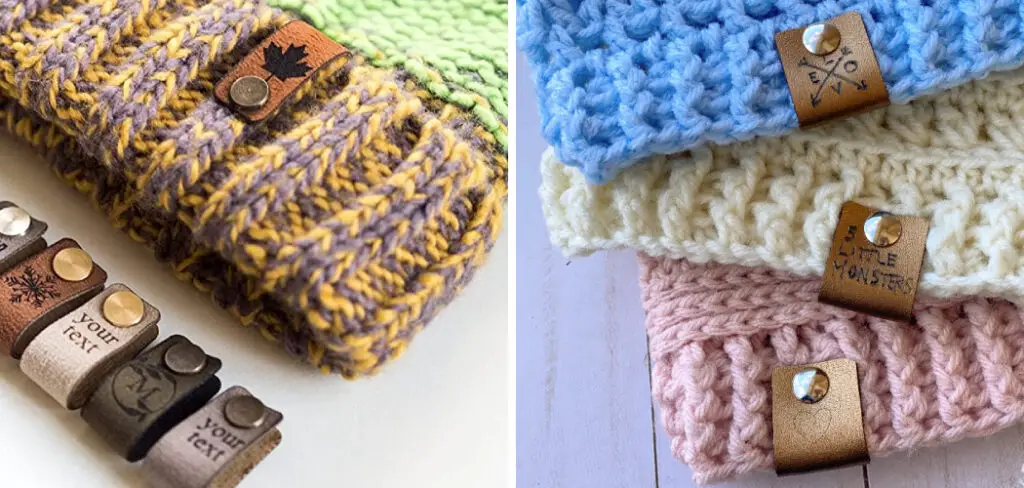
Are you looking for how to make leather tags for crochet items? With leather tags, you can easily spruce up any clothing item or bag. Not only are they incredibly easy to make, but the materials used won’t break the bank. What’s more, is that it will add an air of professionalism and originality to whatever project you decide to use them on!
Leather tags are a great way to do just that and can be used as both coverings or decorations for items like hats, baby blankets, scarves, and more. Not only do they look stylish, but they’re incredibly easy and quick.
In this post, I’ll be guiding you through the entire process from start to finish so even someone who has never tried crafting with leather before can create their very own custom tags!
What Will You Need?
To create your own leather tags, you’ll need the following items:
- Leather (3 square inches)
- Hole punch
- Scissors
- Pen or marker
- Ruler or measuring tape
- Embroidery thread (in the desired color)
- Sewing needle
Once you have all the materials, it’s time to get started!
10 Easy Steps on How to Make Leather Tags for Crochet Items
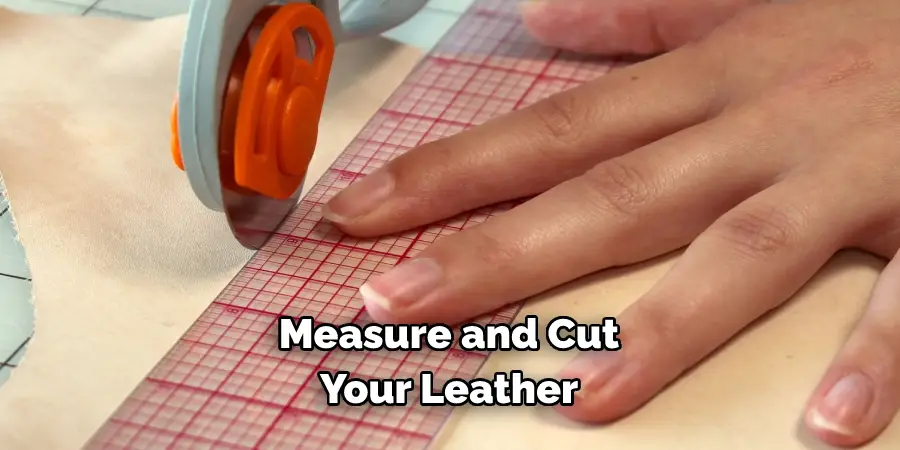
Step 1: Measure and Cut Your Leather
Take your measuring tape or ruler and measure out 3 square inches of leather. This will be the size of your tag. Once you have your measurement, use your scissors to cut along the lines. Now you should have a perfect 3-inch piece of leather ready for crafting!
Step 2: Punch Holes in Your Leather Tag
Make two holes on each side of the leather tag using a hole punch. These will be used to attach thread later on, so make sure that there is enough space for the needle and thread to fit through easily. Try to make sure the holes are evenly spaced so that your tag looks neat and professional.
Step 3: Mark Placement of the Tag
Using a pen or marker, mark the placement of your tag on the item you are using it for. This step is especially helpful if you are attaching the tags to clothing items, as it will help guide you when sewing them on later. Don’t forget to mark the item’s front and back so you know how to position your leather tag accordingly.
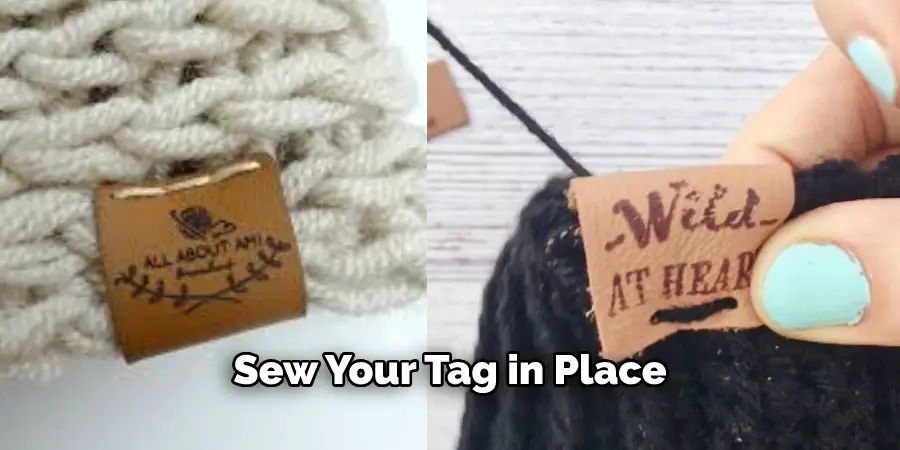
Step 4: Sew Your Tag in Place
Thread your needle with the embroidery thread and sew around the edge of the tag, ensuring it is securely attached. Start from one side and work your way around until you reach the other side. You may need to use a few extra stitches in particularly thick areas, like ribbing or pleats.
Step 4: Sew Tag onto Item
Thread an embroidery needle with thread and secure it through one of the holes in the leather tag. Once secured, place the tag in its desired position and start sewing around all four sides of it to attach it firmly to your item. Ensure all stitching is tight and secure so the tag does not come off easily.
Step 5: Add Embellishments (Optional)
If desired, add any embellishments to the leather tag, such as hand-stamped designs or fabric patches. This step is completely optional, but it can add an extra touch of personality and originality to your tags! Be careful not to add too much, as this can make the tag bulky and heavy.
Step 6: Tie Knots
Once you have finished attaching the tag to your item, tie a knot at both ends of the thread for added security. Ensure that the knots are tight so they don’t come undone over time. Otherwise, your tag may come off.
Step 7: Remove the Access Thread
Using scissors, carefully cut away any access thread from around the edges of your tag. Ensure not to cut too close, as this could cause the tag to be undone. If you’re feeling extra crafty, you can even use a dab of glue to secure the thread in place if desired.
Step 8: Add Tag Label (Optional)
If desired, add a label to the leather tag. This step is completely optional but it can give your tags an extra touch of personality and professionalism. You could use a stamp or fabric paint to create your own design or you could buy pre-made labels from any craft store.
Step 9: Let Dry and Enjoy!
Once all the steps are complete, let your tags dry overnight before using them. And voila! You have now created your very own custom leather tags for crochet items! Remember to store them in a safe place away from light and moisture so they last for years to come.

Step 10: Show Off Your Work
Now that you’ve finished crafting your tags show off your work. Upload photos of them on social media or share them with friends and family. Maybe you’ll even inspire others to make their own tags!
By following these steps, you can easily create beautiful leather tags for crochet items in no time at all. With a little bit of practice and patience, you’ll soon be making tags like a pro. So get crafting and happy tagging!
5 Additional Tips and Tricks
1. Make sure to use a well-sharpened leather punch for clean, crisp edges on your tags.
2. Use an awl or paper clip to make holes in the leather before punching out the tag shapes. This will keep the edges from fraying too much and improves durability.
3. Consider using permanent ink markers instead of paint pens when labeling your tags. This will keep the text from smearing or fading over time.
4. When cutting leather, use a rotary cutter for best results and to avoid fraying of the edges.
5. To add a bit of color or texture to your tags, try embossing them with stamps and using special dyes or colored pencils before filling them in with ink markers. This can add some extra personality to each tag!
With these five tips and tricks, you can easily create beautiful leather tags for all of your crochet projects! Whether you opt for a personalized tag or one with simple stamped designs, your tags will be a special addition to any handmade item. Get creative and have fun with it!
5 Things You Should Avoid
1. Don’t use a normal hole punch for your tags; this will result in jagged edges and uneven shapes.
2. Avoid using regular felt-tip pens, as these tend to smudge easily and can fade over time.
3. Don’t cut the leather too thick or too thin, as this can make it difficult to get a clean shape with the punch and may cause fraying of the edges when finished.
4. Refrain from using any type of glue or adhesive on your tags, as these may not be safe for skin contact and could cause irritation or discoloration of the leather over time.
5. Do not skip out on finishing touches like embossing or stamping—these small details make all the difference in the final product.

With these five tips in mind, you’ll be able to create the perfect leather tag for your crochet items!
How Do You Print on Leather?
Printing on leather can be tricky, but with the right tools and techniques, it is definitely possible. You will need an inkjet or laser printer, special transfer paper made for printing on leather surfaces, and a heat press or iron. First, you’ll want to print your design onto the transfer paper with your printer. Then you’ll need to use your heat press or iron to apply the printed design onto the leather surface.
For best results, make sure you use a medium-high temperature setting for this process and allow adequate time (approximately 15-30 seconds) for the design to fully set into the leather before letting it cool. Once cooled, peel away any excess transfer material from the tag’s edges, and your printed leather tag is complete!
With a bit of practice, you will be able to easily add printed designs onto your leather tags for an even more unique look. Have fun exploring the possibilities that printing on leather can offer!
Conclusion
Crafting leather tags is a great way to make your crochet items even more unique. With the supplies and techniques outlined in this blog post, you will be well on your way to making beautiful tags with a variety of Leatherworking tools and techniques. Not only are leather tags an easy and economical way to add a special touch that sets your handicrafts apart from the rest, but they can also last for years. Leather is a strong material that is both durable and stylish, so if you take care of it, it should last through many creations. Finally, don’t be afraid to get creative when making these tags!
Hopefully, the article on how to make leather tags for crochet items has given you the confidence to create your own unique tags with ease.
Be bold in choosing colors and shapes – any design that suits your craft item will be sure to make it even more memorable. Have fun getting creative and crafting leather tags for your next project!