
Are you looking to update your bedroom with a stylish new headboard and give it a much-needed facelift? Why not try reupholstering an old leather headboard instead of buying something completely new? Have you ever walked into a furniture store and wished that you could own the sleek leather headboard of your dreams? Look no further!

With just a few supplies and some elbow grease, reupholstering a leather headboard can give any bedroom an instant upgrade.
Not only will this project add style to your space, but it will also help extend the lifespan of your cherished piece for years to come. The process typically takes about four hours- enough time for even the most novice do-it-yourselfers to tackle with confidence.
Reupholstering is a great way to revitalize furniture pieces that still have plenty of life in them, saving you money while at the same time giving you the opportunity to customize your décor. In this blog post, we will show you step-by-step how to reupholster a leather headboard so that it looks as good as new! Keep reading to learn how!
What is Reupholstering?
Reupholstering is the process of restoring furniture by replacing the worn out or outdated covering with fresh fabric. It requires removing staples, taking precise measurements, and cutting fabric to precise measurements.
It also involves a bit of hand stitching and knowledge of basic tools, including staple guns, scissors, rulers, and hammers. Reupholstering can be applied to any type of furniture, but leather headboards tend to be the most popular.
Is It Difficult to Reupholster a Leather Headboard?
The difficulty of the project depends on the size, condition, and shape of your headboard. For simple or small headboards, re-upholstering can be a breeze- but for large and complex pieces, it may require more time and effort.
Before getting started, carefully evaluate your leather headboard to determine if this is something you feel comfortable tackling yourself. If you are not comfortable with the task, it is best to leave it to a professional.
Things to Consider Before Starting the Project
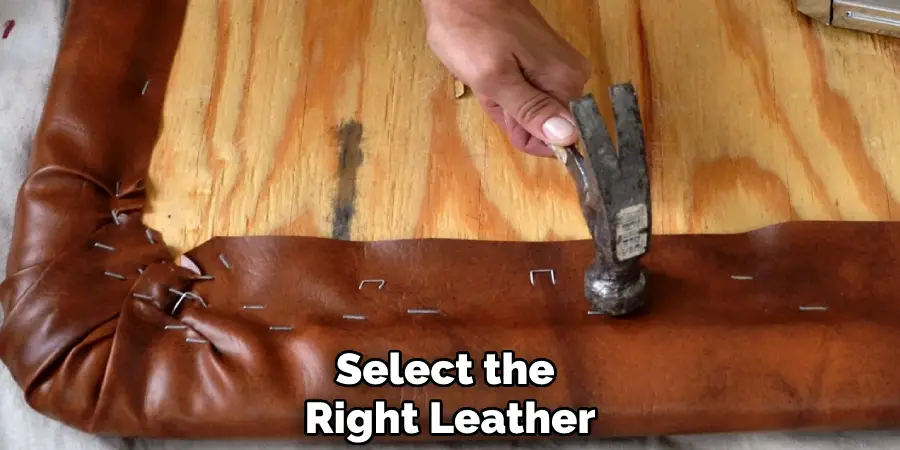
1. Decide on Leather
Before you start, there are a few things to consider. First, determine what type of leather you will be working with- different types require different approaches and supplies. It will be important to select the right leather, so think about factors like color, texture, and durability.
2. Gather Supplies
Next, gather all the supplies you will need for the project. This includes items such as leather upholstery, thread, needles, measuring tape, heavy-duty scissors, and a staple gun. It is also important to decide on fabric before you begin the project.
3. Select a Workspace
Lastly, select an appropriate workspace for the job. It should be clean and well-ventilated, with plenty of room to move around. Make sure all supplies are easily accessible as well. The workshop is much easier and safer when everything is nearby.
Now that you’re familiar with the basics of reupholstering a leather headboard, let’s see what you will need throughout the process.
Required Items
- Leather or fabric upholstery for the headboard
- Spray adhesive
- Foam padding
- Staple gun and staples
- Measuring tape
10 Ways How to Reupholster a Leather Headboard
1. Measure
Begin by measuring your headboard. Knowing the exact size of your piece will be essential for purchasing the proper materials and supplies. In addition, measuring will help you to determine how much fabric or leather is necessary for the project.
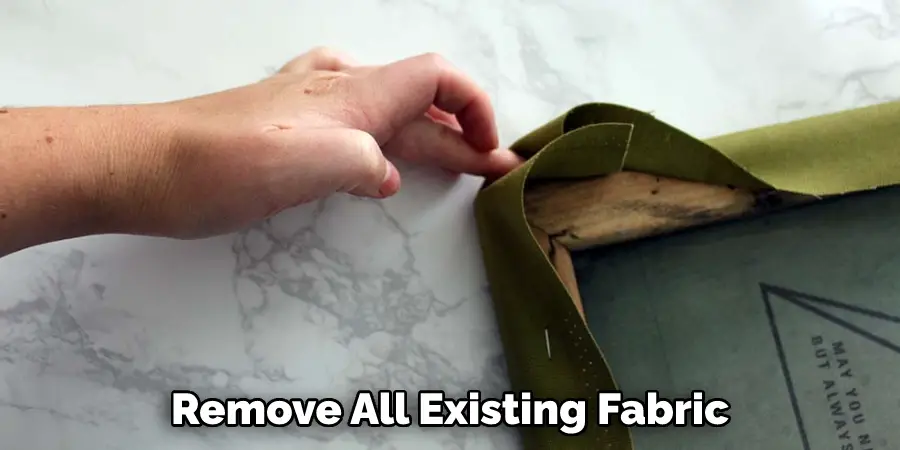
2. Remove
Once you have taken careful measurements, remove all existing fabric from the headboard. This process can be completed with an electric screwdriver or even a basic hammer. Be sure to save all of the screws, staples, and other hardware, as you will need them when it comes time to reassemble.
3. Prepare
After removing all existing fabric and hardware, use a damp cloth to wipe away any excess dust or dirt that may have collected on the frame. Allow the headboard to dry before beginning to reupholster.
4. Cut & Attach
Cut your fabric or leather into desired shape and size using a pair of scissors or an electric knife. Once you have ensured that the pieces fit properly, use spray adhesive to attach them securely to the frame of the headboard.
5 Add Foam
Next, attach pieces of foam padding to the headboard using spray adhesive. Be sure to cut the foam into smaller, manageable pieces before attaching it to the frame. This will help ensure a smooth and even finish when reupholstering.
6. Staple Gun Time!
It’s time to break out the staple gun! With a steady hand and consistent pressure, begin stapling the fabric or leather to the frame of your headboard. Keep in mind that you should avoid over-stapling as this can cause damage to both the fabric and frame.
7. Reassemble
Once all of the fabric has been secured with staples, it’s time to reassemble the headboard. Using your saved screws and hardware, attach the frame of your headboard back together in its original form.
8. Touch Up
To ensure a polished finish, use a pair of scissors or an electric knife to trim any excess fabric or leather away from the edges. So you don’t risk damaging the fabric with scissors, you can also use a lighter to quickly and safely melt away any frayed edges.
9. Finishing Touches
Once all excess fabric has been trimmed away from the frame, apply some spray adhesive to secure any loose pieces of fabric or leather before wiping down the entire headboard with a damp cloth.
10. Enjoy!
You did it! You have successfully reupholstered your headboard and given your bedroom an instant upgrade. Now sit back, relax, and enjoy the fruits of your labor- you deserve it!

That’s all there is to it! Reupholstering a leather headboard is a relatively simple project that can be done in just four hours with minimal supplies. So if you’re looking to transform the look of your bedroom without breaking the bank, this is definitely the option for you!
8 Maintenance Tips
1. Vacuum Regularly
Make sure to vacuum your upholstered headboard at least once a month to prevent dust and dirt from accumulating on its surface. This will help keep the fabric looking fresh and ensure it lasts longer.
2. Protect From Sunlight
Prolonged exposure to sunlight can cause the color of your upholstered headboard to fade over time. To prevent this from happening, hang sheer curtains or move furniture away from the window to limit its exposure to direct sunlight and UV rays.
3. Spot Clean As Needed
If you spill something on your upholstered headboard, it’s important to act quickly. Use a damp cloth and mild detergent to carefully spot clean any spills as soon as possible. Clean the affected area in small circular motions until the stain has been removed.
4. Avoid Harsh Chemicals
Avoid using harsh chemicals or abrasive cleaning products on your upholstered headboard, as they can cause permanent damage to the fabric and fillings. Avoiding these products and sticking with gentle cleaning methods are the best way to keep your headboard looking like new.
5. Don’t Over-Stuff
When reupholstering a leather headboard, be sure not to overstuff it with too much foam or batting, as this can cause the fabric to stretch or lose its shape over time.
6. Fluff Regularly
To help maintain the shape and comfort of your upholstered headboard, be sure to fluff it regularly by gently running your hands along the surface of the fabric. Doing this will help keep the filling in place and prevent it from becoming lumpy or misshaped with use.
7. Rotate Cushions
If your upholstered headboard has cushions, be sure to rotate them every few months so they wear evenly over time. This will help prevent sagging and keep the shape of your headboard looking its best.
8. Don’t Forget the Back!
It’s easy to forget about the backside of your headboard since it’s not always visible. However, it’s important to remember that this area is just as susceptible to dirt and stains as the front, so be sure to give it a good cleaning every now and then.

Following these maintenance tips will help ensure that your upholstered leather headboard stands the test of time and remains to look beautiful for years to come!
Frequently Asked Questions
How Much Will It Cost?
The cost of reupholstering a leather headboard will depend on the size and condition of the headboard, as well as the upholstery fabric you choose. You should expect to pay anywhere from $200 – $500 for professional reupholstery services. Labor costs can also vary depending on the complexity of the job and if any changes are made to the design or structure of the headboard.
How Long Will It Take to Finish the Project?
Reupholstering a leather headboard typically takes between 2-5 hours, depending on the complexity of the job. If you are doing the project yourself and have never reupholstered before, it could take longer as you gain experience with the process and become more familiar with the tools needed. Professional upholsterers may be able to get the job done in less time, depending on their experience.
Conclusion
Reupholstering a leather headboard is not only a great way to give old furniture new life but also an opportunity to express your style and add a unique touch to your home. Not only can it be surprisingly easy, spending just a few hours of your time and investment in materials, but you can also create something that looks like is came from the hands of a professional upholsterer.
Armed with the knowledge presented in this blog post, you are now equipped with all the necessary steps required to recover any leather headboard, so why not give it a try? With patience and practice, you will master the techniques on how to reupholster a leather headboard and quickly become the expert upholsterer you’ve always wanted to be!