
When most people think of car seats, they think of the fabric upholstery that is often stained and faded. However, there is another option: leather car seats. Leather seats are more comfortable, stylish, and durable than fabric seats. In this blog post, we will show you how to sew leather car seats yourself. So, if you are interested in giving your car a facelift, keep reading!
Summary: Sewing leather car seats require basic upholstery skills, such as using a sewing machine and measuring fabric. You will need to measure the size of the seat before cutting the leather to the correct measurement. To begin sewing the seat, you should use a curved needle that is specifically designed for sewing leather material. The curved needle allows for smooth and even stitches that won’t damage the leather.
What Are Leather Car Seats?
Leather car seats are made from the hide of an animal, usually a cow. The hide is first cleaned and then treated with various chemicals to preserve it and make it more pliable. The hide is then dyed and finally finished with a coating that protects it from stains and UV rays. Leather seats are typically more expensive than cloth seats, but they offer several advantages.
Leather is durable and easy to clean, and it also has a luxurious feel. As a result, leather seats are a popular choice for luxury cars. However, leather seats can be prone to cracking and fading over time, so proper care is essential to maintaining their appearance.
Why Should You Sew Leather Car Seats?
Leather car seats have long been a symbol of luxury, and for a good reason. Leather is strong and durable yet soft and comfortable, making it the perfect material for car seats. In addition, leather is easy to care for and maintain and ages well over time. Sewing leather car seats is not as difficult as it may seem, and the results are definitely worth the effort. By taking a few simple precautions, you can sew leather car seats that will last for years to come.
First, be sure to use a heavyweight needle designed for sewing leather. Second, use a strong thread that won’t break easily. Finally, take your time and sew slowly to avoid making any mistakes. With a little care and attention, you can create beautiful, long-lasting leather car seats that will add a touch of luxury to your ride.

How to Sew Leather Car Seats: A Step-by-Step Guide
Step 1: Choose the Right Leather
The first step in how to sew leather car seats is to choose the right type of leather. You’ll want to consider the climate where you live and how often you use your car. If you live in a hot, dry climate, you’ll want to choose thinner leather, so it doesn’t get too hot. If you live in a cold climate, you’ll want to choose thicker leather so it will be less likely to crack.
Step 2: Cut the Pieces
Once you’ve chosen the right leather, you’ll need to cut it into pieces that will fit your car seats. First, you’ll want to measure the seat and then add an extra inch or two all the way around. This will give you enough room to sew the leather without it being too tight.
Step 3: Sew the Pieces Together
Now that you have all of your pieces cut out, it’s time to sew them together. Again, you’ll want to use a heavy-duty sewing machine for this project so that the stitches don’t come undone. Start by sewing the two side pieces together and then sew the top and bottom pieces to those.
Step 4: Attach the Leather to the Seat
Now it’s time to attach the leather to the seat. You’ll want to use a strong adhesive to leather for this step so that the leather doesn’t come off. Apply the adhesive to the back of the leather and then place it on the seat. Use something heavy to press down on it so that it adheres well.
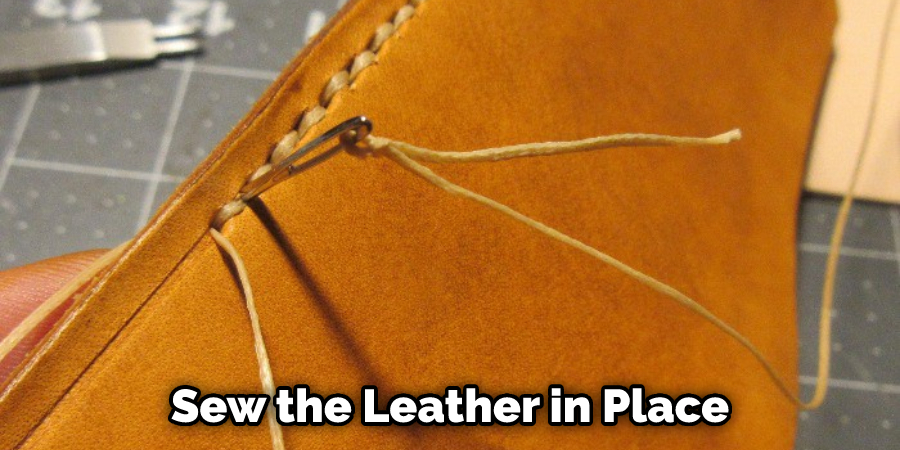
Step 5: Sew the Leather in Place
Once the leather is attached to the seat, you’ll need to sew it in place. This will ensure that it doesn’t come off and that it looks nice and neat. Start by sewing around the edges of the leather and then sew a few lines across the middle.
Step 6: Trim the Excess Leather
Once you’ve sewn the leather in place, you’ll need to trim off the excess. You can use a sharp knife or scissors for this step. Just be careful not to cut into the seat itself.
Step 7: Enjoy Your New Car Seats!
Now that you know how to sew leather car seats, you can enjoy your newly upholstered seats! They’ll add a touch of luxury to your car and be much more comfortable than the factory seats. So don’t wait any longer; get started today!
This guide provides step-by-step instructions on how to sew a leather car seats. It includes information on choosing the right leather, cutting the pieces, sewing the pieces together, attaching the leather to the seat, and trimming the excess. With this guide, you can easily add a touch of luxury to your car.
Tips & Tricks To Prevent Further Damage To The Leather Car Seat:
Here are some tips and tricks to help prevent further damage to your leather car seat:
- Regularly clean your leather car seat with a damp cloth and a mild leather cleaner designed specifically for the material.
- Use conditioners and protectants designed specifically for leather that will help keep your seat looking better for longer.
- Avoid exposure to direct sunlight, which can cause the leather to fade over time.
- Place some fabric over the car seat when you’re not using it, as this will help protect it from dust, dirt, moisture, and other factors that can cause wear and tear on the material.
- Make sure food is never placed directly on the car seat as it can lead to staining or discoloration of the material.
What You Need to Know When Sewing Leather Car Seats
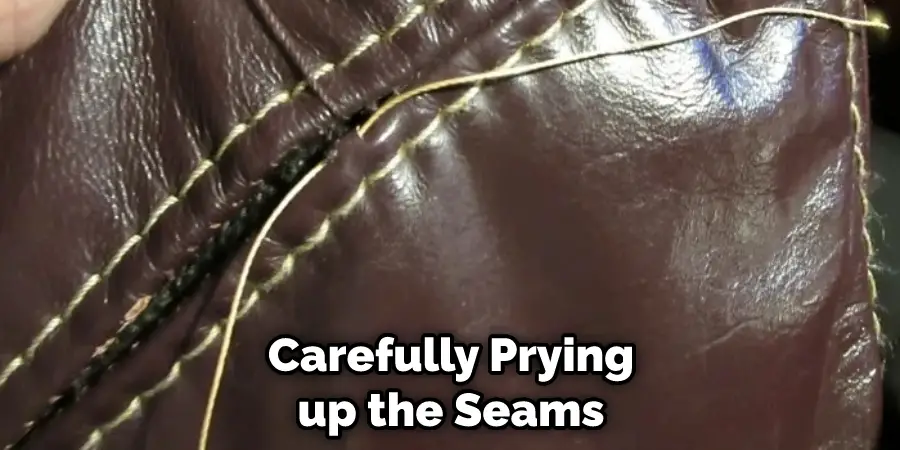
Leather car seats are a luxurious addition to any vehicle, but they can be pricey to replace if they become damaged. Fortunately, with a little know-how, you can sew leather car seats yourself. The first step is to remove the old upholstery from the seat. This can be done by carefully prying up the seams with a putty knife. Next, measure the seat dimensions and cut new leather pieces to fit.
Be sure to allow for slight inaccuracies in your measurements by cutting the leather slightly larger than necessary. Once the new leather is cut, attach it to the seat using heavy-duty upholstery thread and a curved needle. Start at the center of the seat and work your way out toward the edges.
When you reach the end, trim off any excess thread and leather. Finally, use a steam iron to smooth out any wrinkles in the new upholstery. With a little effort, you can have Leather car seats that look as good as new—without spending a fortune at the auto shop.
What Tools Do You Need to Sew Leather Car Seats?
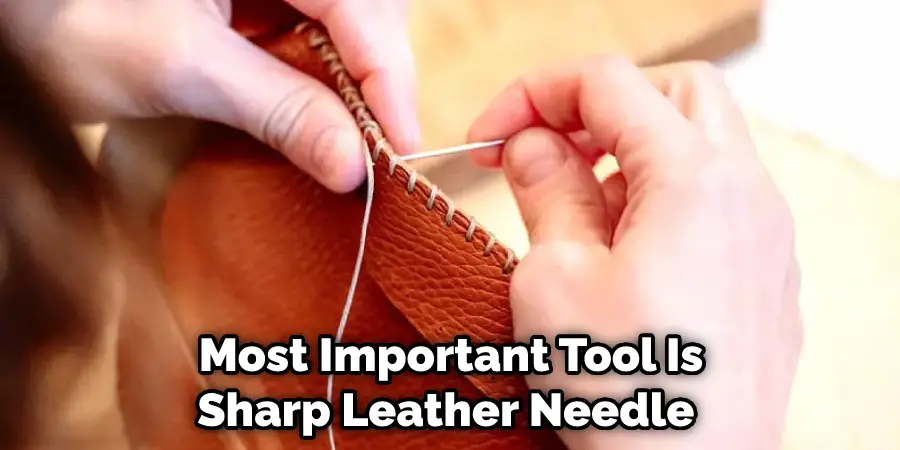
Sewing leather car seats may seem daunting, but it can be surprisingly easy with the right tools. The most important tool you’ll need is a good, sharp leather needle. Leather needles are designed to pierce through thick material without breaking and come in various sizes to accommodate different thicknesses of leather. You’ll also need a heavy-duty sewing machine that can handle the thickness of the leather, as well as a rotary cutter and cutting mat.
These will come in handy for cutting straight lines and precise circles. Finally, you’ll need some strong thread – either polyester or nylon – in a color that blends in with the leather. With these tools on hand, you’ll be ready to sew leather car seats like a pro.
What Kind of Leather Should I Use to Sew Car Seats?
There are a few things to consider when it comes to sewing car seats. First, the type of leather you use is important, as it needs to be durable enough to withstand regular wear and tear. Leather is also a good choice because it is easy to clean and maintain. However, it is important to ensure that the leather you use is compatible with the upholstery in your car.
You will also need to choose a strong thread to hold the leather in place. A heavy-duty thread can withstand the stress of sitting and leaning against the seat. Finally, you will need to select a needle that is the right size for the thickness of the leather. With a little time and effort, you can sew a beautiful car seat that will last for many years.
How Do I Make a Custom Seat Cover for My Car?
You love your car, but the upholstery is looking a little tired. Of course, you could buy new seat covers, but why not put your own personal touch on things by making a custom seat cover for your car? It’s not as difficult as you might think, and plenty of online tutorials help you get started.
The first step is to measure your seats. Next, you’ll need to know both the back and bottom cushions’ width, depth, and height. Once you have these measurements, you can start shopping for fabric. You’ll want to choose a durable and easy-to-clean fabric, as it will be exposed to a lot of wear and tear. Patterned fabrics can also be a good choice for seat covers, as they can help to hide any dirt or stains.
Once you’ve chosen your fabric, it’s time to start sewing. If you’re not confident in your sewing skills, plenty of no-sew options are available that use Velcro or adhesive instead of stitching. Whichever method you choose, making your own custom seat cover is a great way to add personality to your car while protecting your investment.
Conclusion
Sewing leather car seats is not as difficult as it may seem. With the right tools and a little practice, you can create beautiful and durable leather car seats for your vehicle. If you are looking to add some extra flair to your car or want to replace old, worn-out seats, consider sewing your own! Thanks for reading our post about how to sew leather car seats.